To understand some of the projects below you must understand that any energy usage we can remove from the grid benefits the solar or green goal.
Project S-3 Heat Collector
This has legal patent pending protection and is not an open source idea.
The heat collector recaptures heat from poor efficiency in heat sources such as wood burning or gas stoves. It's scope is not limited to just these items and can be used anytime there is an exhaust system which contains heat.
I am currently working on quotes for production and should be listing the first phase product on amazon.com before 1Q 2014 unless a buyer comes within the first 12 months with an offer that allows ample funding for our research and development segment.
Project S-3 is categorized under our for-profit segment which helps to provide funds for other research including open-source ideas.
More details:
The invention is used to capture heat from a wood burning or gas stove or
similarly exhausted heating element that otherwise would have escaped through the
exhaust pipe or vent. It wraps around a standpipe in the case of a wood burning stove (for
example) and requires no removal of existing fixtures.
In the preferred embodiment, the present invention is constructed of sheet metal
with bends that are triangular in shape allowing air to travel through them, expanding the surface area of the metal in contact with the exhaust. This heat is then naturally
transferred back into the room as the heated air within the channels naturally flows
upward, drawing in cooler air from the bottom which continues to feed the process so
long as a heat source is provided or so long as heat is still traveling through the exhaust
pipe. The present invention is fastened on the back side of the unit holding it onto the pipe like a clamp. It wraps around the standpipe/exhaust pipe.
While in the preferred embodiment, the design of the present invention is in the
shape of triangles with gaps between each channel, the present invention is not limited to
this shape. A rectangular or square shape could be used in place of the triangles to allow
for more contact with the stand pipe.
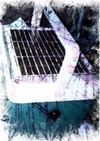
Project S-1 - Children's "Power-Wheels"-type vehicle Solar Conversion
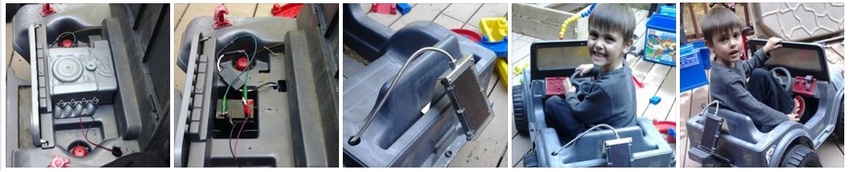
This initial project was to fulfill two primary needs:
1) To reduce the number of times I would physically need to setup a charging cable for my son's Jeep
2) To reduce grid dependency of the vehicle in question
Key tips for this project:
Drill a hole in the driver-side rear body tub to allow cord insertion from the solar panel. Drill another hole under the body tub to pull the wiring through, and drill a final hole towards the receiving end of the vehicle- in my case the driver-side front, near the hood. The reason the undercarriage drilling is needed is to allow the cable to sag towards the rear and rise up again before meeting with the battery compartment. Doing this ensures that if any rain or moisture makes its way down the power cable, it will simply drip off instead of making its way to the battery terminal. This also eliminates the need to seal or use a cover over the holes you have drilled. You also might consider adding a bumper so the little one won't snap the solar panel off...I used a file holder I had in the shed.
Click here for a full parts list for this project.
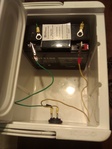
Project S-2 The Embry Power Cell (Solar for everyone)
The Embry Power Cell was developed in early 2012 hoping to emerge sometime in 2013...unfortunately someone else filled the gap where I was working. You can make yourself a small solar generator for just under $100. It won't run your entire home, but it can power a few accessories, keep your cell phone charged in an emergency, run a fan, lights, any number of things that might need to stay powered on.
I designed the generator with the masses in mind, with equipment that should be fairly easy to get. It's shell is waterproof up to the point you drill into it (mine was about 8 inches), which would come in handy in a flood or hurricane scenario (something the "others" didn't think of in their design).
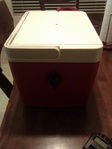
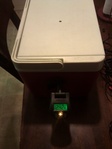
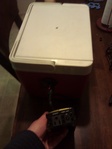
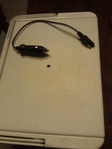
You can charge it with a 6v/12v AC plug that has alligator tips, or via a solar panel hooked to a solar charge controller ($20) to prevent drainage at night. Don't want to keep disconnecting wires? Just buy a trickle solar panel for cars, it already has a DC lighter adapter and you just plug it into your DC outlet on the front of the generator. Drill your hole higher to make it more water proof up to that point. The ice chest will float in the event of a flood. Use a boat DC lighter inlet and it's lid also makes a seal when closed.
You can also make it work with a number of additional accessories, I used an AC converter, a voltage check tool, DC lights, and more. Of particular importance for me was the little $5 USB car chargers you can just plug directly into the DC outlet, allowing your cell phone to charge without the use of the AC invertor...which takes up a large amount of energy to begin with.
For emergencies, I recommend charging the battery twice a year, for 3-4 hours on the wall AC type charger...or use your solar panel. It will receive a higher charge if you use the wall outlet for the initial charge and long-term storage and use the solar panel as a trickle charger to keep it topped off. I drilled a hole in the top lid to allow the solar panel wires to drop down with enough slack left for me to open/close the ice chest where I also happened to store all of the accessories. Good luck!
Click here for a full parts list for this project.
This site maintains small graphic size and basic html to ensure error-free cross-platform viewing for mobile and fixed asset devices using varying internet speeds.


